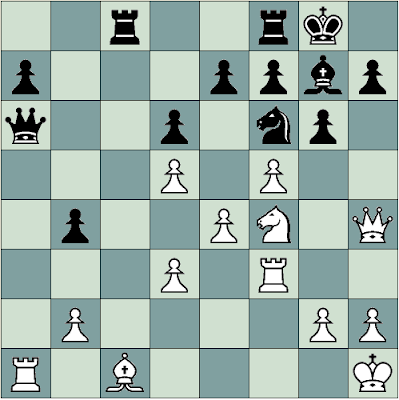
This is a game I played on a correspondence chess website. The beginning of the game is excessively boring and symmetrical, and I thought it was going to be a draw, but my opponent was lower-rated than I am (around 1700 -- I am around 2000 on that website), and it did show in the endgame, where he played carelessly.
-
1.e4 e5 2.Nf3 Nc6 3.Bc4 Be7 4.O-O Nf6 5.Nc3 O-O 6.d4 d6 7.dxe5 dxe5 8.Bg5 Bg4 9.Be2 Bxf3 10.Bxf3 Qxd1 11.Raxd1 Rad8 12.Bxf6 Bxf6 13.Nd5 Nd4 14.Rd3 Nxf3+ 15.Rxf3 c6 16.Nxf6+ gxf6 (D)
-
 17.Rg3+!
 - An in-between move which gets Black's king further away in the corner of the board. In endgames, tempi tend to get very important, so it's not a bad idea to always look for such details, whether they seem relevant at the moment of the move or not.
-
17. ... Kh8 (D)

18.Rd3 - 18. Ra3 was also possible in order to stop Black from playing Rd2, because he'd be losing a pawn, e.g. 18. Ra3 Rd2 19. Rxa7 Rxc2 20. Rxb7.
18. ... Rd4? - Definitely better was 18. ...Rxd3, which would have given me a backward d-pawn. 19. cxd3 Rd8 20. Rd1, and White's position is definitely not as good as in the actual game. Moreover, after 19. Rxd4 exd4, Black now has double isolated pawns.
20.Rd1 c5 (D)
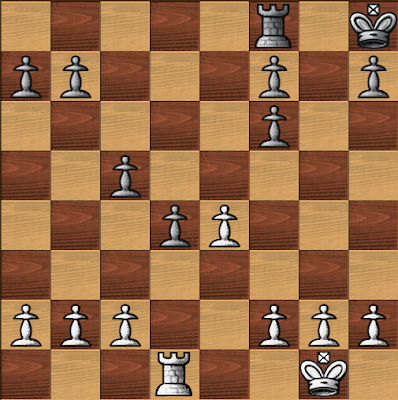
21.a4! - Making sure Black can't activate his Queenside majority too much. In Rook endgames in which pawns are all on the same side of the board, the side with the majority should try to push their pawns as much as possible and cramp their opponent. Meanwhile, the defender should try to make it impossible for their opponent to do such a thing; that's what I am doing now, even though there are pawns on both sides of the board. My reasoning is, if Black is going to get a passed pawn or connected passed pawn or something like that on the Queenside, I might be afraid of him making a new queen EVEN IF we have pawns on the other side of the board. I'd rather if he didn't make a new queen at all, you know...
-
21. ... b6?! (D)

Probably better was 21. ...a6, preparing ...b5 and ...c4, activating his pawn majority, trying to create a passed pawn.
22.f3 - Eventually, Black is going to attack the e-pawn with either ...Re8 or with ...f5. I thus protect this pawn while making room for the king to come into the game.
23. ...Kg7 (D) 23.c3! - Either opens up the d-file and activates my rook, or gives Black an isolated d-pawn (with or without Rooks). He opted for the latter.
23. ... Rd8 24.cxd4 (D)
 24. ... cxd4 - The only move. Rook endgames tend to be very drawish. As Müller and Lamprecht put it in their Fundamental Chess Endings (p.249): "[...] a drawish tendency is inherent in many rook endings. So be careful when you exchange your last rook in an inferior position!" Entering a K&p ending with such a pawn structure -- isolated d-pawn, double isolated f-pawns, isolated h-pawn -- would have been suicide from Black's side.
25.Kf1!! - The natural 25. Kf2?! makes it easier for Black to reach a draw, by acivating his own Rook. The active Rook is crucial in Rook endings, and here after 25. Kf2?! Rc8!, the pawn is virtually immune since 26. Rxd4 Rc2+ gives tremendous activity to Black's Rook, who wins back the pawn anyway. Also, Black's d4-pawn is a weakness, and since it's isolated, odds are I'll be able to win it soon enough. I should be in no rush getting rid of his permanent weaknesses, mostly if it means I am going to lose one of my own not-so-weak pawns doing so. Notice that after the excellent 25. Kf1, if 25. ...Rc8?!, I can just take the d4-pawn since 26. ...Rc2 doesn't come with check. I wouldn't lose back any pawn, and just would be up a pawn.
25. ... Kg6 26.Ke2 (D)

26. ... f5 - A good move. His two f-pawns are incredible weaknesses, so he's getting rid of one of them while possibly giving me one, i.e. and isolated e-pawn.
27.Rc1 - Now that my King can defend against Black's passed pawn, I can activate my Rook.
27. ... fxe4 28.fxe4 d3+ 29.Ke3 f5 30.exf5+ Kxf5 (D)
 31.Rd1
 Winning the d3-pawn
31. ... Ke5 32.Rxd3 (D)  33. ... Rc8! - Black correctly avoids the exchange of Rooks. It is much, much easier for Black to hold for the draw with the Rooks still on the board.
33.Rc3! - Avoiding all possible counterplay from Black. If 33. Rd7 instead, Black had 33. ...Rc2, which looks just too active for what I would like. Black should now play 33. ...Rg8! 34. g3 Rg4, activating as much as he can. But mostly, he should NOT trade Rooks; remember, Rook endings are rather drawish, whereas K&p endings aren't -- and would the Rooks come off, White is certainly winning due to his extra pawn on the Kingside. But, oh well, he traded Rooks anyway... not in such a good way either, but it's lost anyway.
33. ... Rc5? 34.Rxc5+ bxc5 (D)
 35.g4! - Beware! -- 35. h4?(or ??) h5! would be as bad as it could get. When you have a majority on a side, advance the extra pawn first.
35. ... c4 36.h4! - Mobilizing the majority. Müller & Lamprecht in Fundamental Chess Endings give the following guidelines as to what to do in a K&p ending when you have a side majority (p.46):
You activate your King;
You mobilize your majority (i.e., you create a passed pawn where your majority is);
- You go on the other side with your King and take your opponent's pawns.
36. ...h6 (D)
 37.a5! - Remember what I said about tempi? They're very important in endgames, and you should always look for ways to gain time. With the text, my a-pawn is one step closer to queening, and the beauty is that Black has no moves, so I *can* take my time and take care of such small details. Odds are that I'm going to create a passed pawn on the Kingside and thus force Black to defend on that side of the board. Meanwhile, I'll go on the Queenside, take his pawns and queen my a-pawn, which is why the furthest it is up the board, the better it is for me. Plus, since Black can't get his King too far away from my pawn majority, and that all his pawns but one can't safely move, I must not be afraid of making slow moves. Black is just frozen, so before making a passed pawn, I can take my time and make my position even better. That's why I didn't play g5 right away, even though I could have. Oh, it's slow in correspondence chess, true... but I'm patient :)
37. ...a6 38.g5 Creating the passed pawn, which from now on becomes nothing but a decoy to take Black's king away from the real action. 38. ... h5 39.Kd2 Ke6 40.Kc3 1-0 (D)

Black can't even leave the Queenside now, because of my protected passed g-pawn. All in all, Black should have tried and activate his Rook more throughout the game, and mostly, he shouldn't have traded down into a K&p ending. From the initial position, where we started our analysis, my guess is that the game should have ended in a draw. But Black failed to activate his own majority, ended up with positional weaknesses, and later on failed to activate his Rook. Meanwhile, I was able to immobilize his pawn majority, and then take his weak isolated d-pawn. I then converted my extra pawn in a passed pawn in a K&pawn ending, and it was all over.
We can take two very important statements from this ending (which are known to be true anyway, as far as Müller & Lamprecht are concerned at least, given that they say the same thing in their Fundamental Chess Endings):
- Activity of the Rook in Rook endings is crucial;
- If you are on the losing side, keep your Rook as long as the pawn ending isn't drawn -- it's much easier to hold for a draw with the Rooks still on the board!