I reached the dominating position below in a casual 10 3 game on lichess after 20. Nb6 Qa7:

Here my knight on b6 is attacked, but my b2 pawn is also threatened by the bishop on g7. I could try to defend both with, for instance, 21. Nxc8 Rbxc8 22. b3, but I didn't want to give up my knight for the c8 bishop, which has very limited scope right now (it can't develop to b7 because of Rc7 or to f5 because of e4). I also didn't want to give up the control of the c-file. So instead I sacrificed the b2 pawn and played 21. Rc6 (defending the knight, and perhaps preparing Rfc1) 21. ... Bxb2:
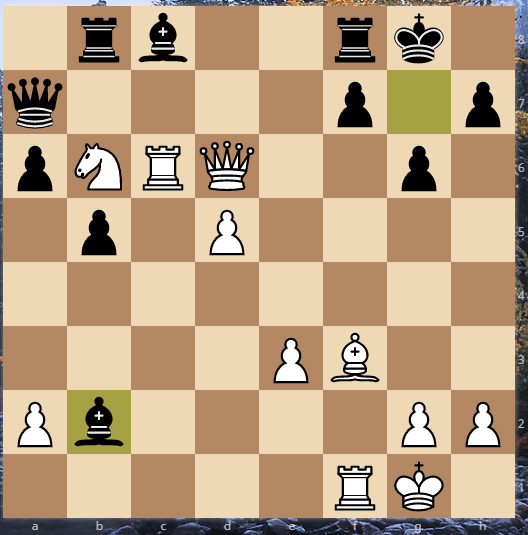
I wasn't sure how to best play this position. Of course 22. Rfc1 is not immediately possible. I'm still trying to prevent Black from activating his pieces, and the best way to do this is to prevent Black from developing the c8 bishop, which is also preventing the rooks from being connected. So I played 22. Kh1, so that I can play e3-e4 if Black attempts Bf5 (Bb7 is still not a good idea in view of Rc7). Next I can think of playing Rf2-c2 or even e3-e4-e5. But my opponent tried a bad tactic here, he played 22. ... Ba6?:

The goal of this move was to free his position with 23. Qxa3 Rxb6, exchanging my forward knight for his dark-squared bishop. I successfully took advantage of this mistake, but it turns out there was a slightly better continuation which I had dismissed early on in my calculations. Here I played the simple 23. Nxc8 Bxd6 24. Nxa7, which won a piece (Black continued with 24. ... Ra8 25. Rxd6 Rxa7, though Stockfish recommends 24. ... Rfd8 instead).
But I had a better way to take advantage of 22. ... Ba6. I could simply play 23. Qxa3!, which I had dismissed because of the obvious 23. ... Rxb6, but here White has the move 24. Qc4!:

And Black would have been forced to play 24. ... Rb7 (safeguarding the rook), which loses the bishop after 25. Rxc8. The passed d pawn is ready to be pushed, which would also open up the attack of the f3 bishop onto the b7 rook.
For what it's worth, the difference in Stockfish evaluations between my continuation and the best continuation is about 2 pawns, ~+4.2 vs. ~+6.1.
The full game is available here: