Why more specifically would we want to sacrifice a piece when our opponent's King is trapped -- or almost trapped -- somewhere? To remove its flight squares. By sacrificing one of our useless pieces, i.e. our decoy, we can force our opponent to capture it and thus occupy a square that was once available to the King in order for him to escape.
Staying alert for such sacrifices when the opponent's King is almost frozen is important. We all know that when the two Kings face each other with one square between them, both Kings can't move in the direction of the opposed King. One of the flight sides of the King has thus been taken care of!, now the task is to remove the remaining flight squares.
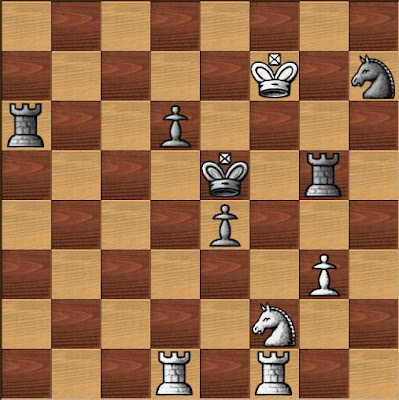
Let's take this following position:
Black's King is in a precarious position, frozen in the middle of the board. It can't move towards White's King, and in fact only has one square available to him at the moment. Maybe White can remove it? 1. Ng4+! Throwing away the decoy. Black is forced to recapture and blocks a square near the King. 1. ... Rxg4 2. Rf5+! The two Kings will now face each other, and Black's space is narrowing down. This last move forces Black where available squares are missing. 2. ... Kxf5 3. Rd5# (D)

White needed only one Rook to mate, since Black's King has seen all of its flight squares taken away! Two decoys were needed in order for White's Rook to deliver mate along a single rank, but my guess is that White shouldn't regret it :)
Try finding the solution to the next game. It is extremely similar, so you should be able to find it within a few seconds.

====================
Solution:
1. Ne5+ Rxe5 2. Rf4+! (forcing the King where flight squares lack) Kxf4 3. Rh4#
====================
No comments:
Post a Comment